Building muscle isn’t just about lifting heavier weights or spending more hours in the gym. For those looking to break through plateaus and reach new levels of strength and muscle growth, advanced techniques are essential. Here are the top 10 advanced muscle-building techniques to help you unlock your true strength potential.
1. Progressive Overload with a Twist
Progressive overload is the cornerstone of muscle growth, but to keep your muscles guessing, incorporate microloading. This involves adding small increments of weight (as little as 0.5 to 1 pound) to your lifts regularly. These small increases can make a big difference over time and keep you progressing steadily.
Progressive overload is a fundamental principle in strength training that involves gradually increasing the stress placed on your muscles to stimulate growth and strength gains. While the classic approach of adding weight to the bar works well, advanced lifters often need a more nuanced strategy to continue making progress. Enter microloading and other innovative techniques that add a twist to traditional progressive overload.
The Basics of Progressive Overload
At its core, progressive overload means consistently challenging your muscles with increasing levels of resistance or intensity. This can be achieved by:
- Increasing Weight: Adding more weight to your lifts.
- Increasing Reps: Performing more repetitions with the same weight.
- Increasing Sets: Adding additional sets to your workout.
- Decreasing Rest Time: Reducing the rest periods between sets.
The Microloading Technique
Microloading is a subtle yet powerful variation of progressive overload, particularly beneficial for advanced lifters who might struggle with adding significant amounts of weight each session. Here’s how it works:
- Small Increments: Instead of adding the typical 5-10 pounds, microloading involves adding as little as 0.5 to 2 pounds per session. These small, manageable increases can keep you progressing without overwhelming your muscles.
- Special Equipment: To implement microloading effectively, invest in fractional weight plates or magnetic weights that can be easily attached to your barbell or dumbbells.
- Consistency: The key to microloading is consistency. Regularly adding even the smallest amount of weight ensures continuous progress over time.
Other Innovative Techniques
In addition to microloading, there are several other advanced methods to enhance your progressive overload strategy:
- Wave Loading:
- Cycle Intensities: Alternate between periods of higher and lower intensity within your workout or training week. For example, you might start with a heavy set of 3-5 reps, followed by a lighter set of 8-10 reps. This variation prevents adaptation and promotes continuous growth.
- Tempo Training:
- Controlled Movements: Manipulate the speed of your lifts to increase time under tension. For example, you might lower the weight slowly (eccentric phase) over 3-5 seconds and then lift it explosively (concentric phase). This technique enhances muscle fiber recruitment and stimulates growth.
- Rest-Pause Sets:
- Mini-Sets: Break your set into smaller segments with short rest periods (10-20 seconds) in between. For instance, perform a set to near-failure, rest briefly, and then complete additional reps. This method allows for increased volume and intensity without overloading your muscles in a single continuous set.
- Variable Resistance:
- Resistance Bands or Chains: Incorporate resistance bands or chains to alter the resistance curve of your lifts. This technique makes the lift harder at the peak contraction and easier at the beginning, ensuring constant muscle engagement throughout the entire range of motion.
- Complexes and Clusters:
- Combination Lifts: Perform complexes (a series of exercises performed back-to-back without rest) or cluster sets (small groups of reps with short rests) to increase the intensity and density of your workouts. These methods can boost metabolic stress and muscle fatigue, key drivers of muscle growth.
Implementing Progressive Overload with a Twist
To effectively incorporate these advanced techniques, follow these guidelines:
- Track Your Progress: Keep a detailed training log to monitor your weights, reps, sets, and other variables. This helps you identify patterns and make necessary adjustments.
- Prioritize Recovery: Advanced techniques can be taxing on your body. Ensure adequate rest, nutrition, and recovery strategies to support muscle repair and growth.
- Periodize Your Training: Use periodization to cycle through different phases of intensity and volume. This prevents overtraining and ensures long-term progress.
- Listen to Your Body: Pay attention to how your body responds to these techniques. If you experience excessive fatigue or discomfort, adjust your training accordingly.
2. Advanced Periodization
Periodization involves cycling through different training phases to optimize gains and recovery. For advanced lifters, undulating periodization, where you vary your training volume and intensity more frequently, can be particularly effective. This method keeps your body from adapting too quickly and enhances overall muscle growth.
Periodization is the systematic planning of athletic or physical training. Its aim is to reach the best possible performance in the most important competition of the year. For advanced lifters, simple linear progression might no longer yield the desired results. Instead, advanced periodization techniques can optimize gains, prevent overtraining, and keep your workouts fresh and challenging.
Understanding Basic Periodization
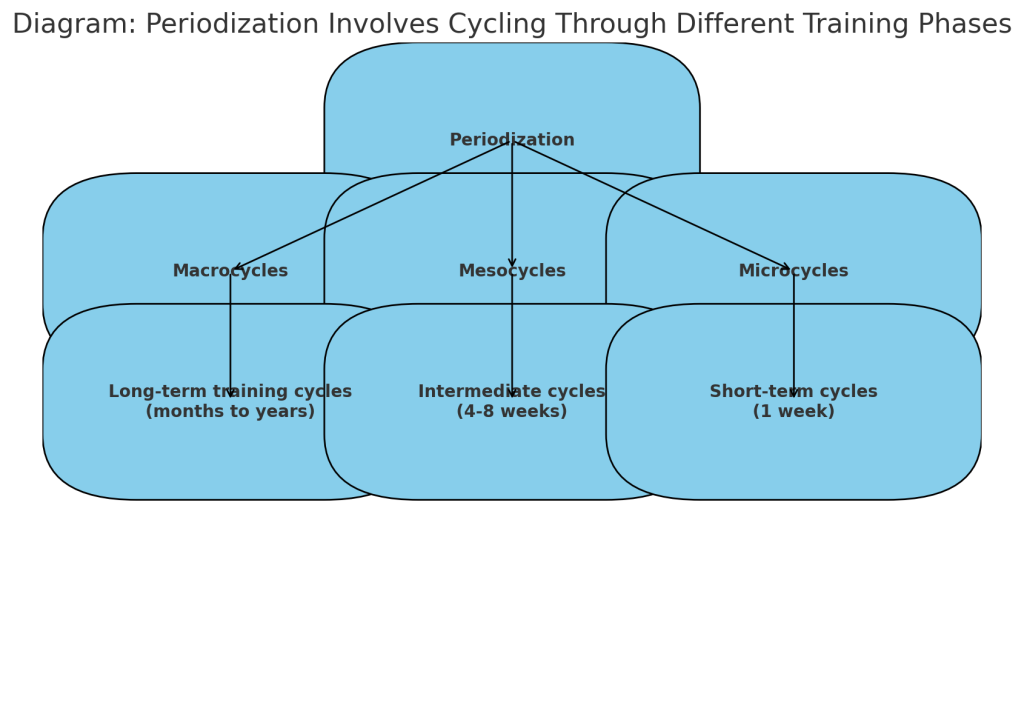
At its core, periodization involves dividing your training program into specific phases, each with a distinct focus. The traditional model includes:
- Macrocycles: Long-term training cycles, typically spanning several months to a year.
- Mesocycles: Intermediate cycles within the macrocycle, usually lasting 4-8 weeks.
- Microcycles: Short-term cycles within the mesocycle, often lasting a week.
Each phase has specific goals, such as building endurance, strength, or power, and the training intensity and volume are adjusted accordingly.
Advanced Periodization Techniques
For those who have mastered the basics, advanced periodization offers more sophisticated methods to continue progressing. Here are some advanced techniques:
- Undulating Periodization
Undulating periodization involves frequently changing the training variables (volume, intensity, and exercise selection) to keep the body constantly adapting. Unlike linear periodization, where intensity increases while volume decreases steadily, undulating periodization can vary these factors on a daily or weekly basis.
- Daily Undulating Periodization (DUP): Changes occur within the same week. For example:
- Monday: High volume, moderate intensity (e.g., 4 sets of 10 reps).
- Wednesday: Moderate volume, high intensity (e.g., 4 sets of 6 reps).
- Friday: Low volume, very high intensity (e.g., 4 sets of 3 reps).
- Weekly Undulating Periodization (WUP): Changes occur each week, cycling through different phases.
- Block Periodization
Block periodization divides the training program into focused blocks, each emphasizing a specific attribute. These blocks are sequenced to build upon each other, ensuring progressive adaptation and peak performance.
- Accumulation Block: Focuses on building a base of general strength and hypertrophy with higher volume and moderate intensity.
- Transmutation Block: Shifts towards more sport-specific or goal-specific training with moderate volume and higher intensity.
- Realization Block: Peaks performance with low volume and very high intensity, preparing for competition or testing.
- Conjugate Periodization
Conjugate periodization, popularized by Westside Barbell, involves training multiple attributes simultaneously, but with varying emphasis. This method ensures balanced development and avoids stagnation.
- Max Effort Days: Focus on lifting maximal weights to build absolute strength.
- Dynamic Effort Days: Use lighter weights with maximum speed to improve explosive power.
- Repetition Effort Days: Employ higher reps to build muscle mass and endurance.
- Auto-Regulatory Periodization
Auto-regulatory periodization adapts the training program based on the athlete’s performance and recovery status. This method relies on biofeedback, performance metrics, and subjective measures (like perceived exertion) to adjust the training intensity and volume in real time.
- Performance-Based Adjustments: Modify the training load based on performance in warm-ups or initial sets.
- Recovery Monitoring: Use tools like heart rate variability (HRV) or subjective wellness questionnaires to guide training adjustments.
Implementing Advanced Periodization
To successfully implement advanced periodization, follow these steps:
- Assess Your Goals: Determine your primary objectives, whether it’s building strength, muscle size, or enhancing athletic performance.
- Plan Your Macrocycle: Outline your long-term training plan, including key competitions or testing dates.
- Design Your Mesocycles: Break down your macrocycle into focused mesocycles, each with specific goals and periodization methods.
- Customize Microcycles: Create detailed weekly plans that align with your mesocycle objectives, incorporating the chosen periodization technique.
- Monitor and Adjust: Continuously track your progress and be prepared to adjust your plan based on your performance, recovery, and feedback.
Benefits of Advanced Periodization
Advanced periodization offers several key benefits:
- Enhanced Adaptation: By frequently varying training variables, you ensure continuous adaptation and prevent plateaus.
- Improved Performance: Structured phases optimize different aspects of fitness, leading to better overall performance.
- Injury Prevention: Properly planned training loads reduce the risk of overtraining and injury.
- Motivation and Variety: Regularly changing workouts keeps training interesting and maintains motivation.
By integrating advanced periodization techniques into your training regimen, you can unlock new levels of performance and muscle growth. Tailoring your program to your specific needs and goals will ensure long-term success and continuous improvement.
3. Cluster Sets
Cluster sets break your usual sets into smaller, more manageable segments with short rest periods in between (10-20 seconds). This allows you to lift heavier weights for more total reps, increasing your overall volume without compromising form or risking injury.
| Exercise | Weight (% of 1RM) | Reps per Cluster | Clusters per Set | Rest Between Clusters | Total Sets | Rest Between Sets |
| Bench Press | 85 | 2 | 4 | 15 seconds | 3 | 2-3 minutes |
| Squats | 80 | 3 | 3 | 20 seconds | 4 | 3 minutes |
| Deadlifts | 85 | 2 | 4 | 15 seconds | 3 | 3 minutes |
| Overhead Press | 80 | 2 | 5 | 10 seconds | 3 | 2 minutes |
| Rows | 75 | 4 | 3 | 15 seconds | 3 | 2-3 minutes |
| Leg Press | 80 | 3 | 4 | 20 seconds | 3 | 3 minutes |
Cluster sets are an advanced training technique designed to help you push past your limits by allowing you to handle heavier weights and perform more reps than traditional sets. This method involves breaking a set into smaller, manageable segments with short rest intervals in between. By incorporating cluster sets into your routine, you can increase overall training volume and intensity, leading to significant muscle growth and strength improvements.
What Are Cluster Sets?
Cluster sets divide a standard set of repetitions into smaller clusters with brief rest periods (typically 10-30 seconds) between each cluster. For example, instead of performing 8 continuous reps, you might break this into 4 clusters of 2 reps with 15 seconds of rest between each cluster. This approach allows you to lift heavier weights for a higher total number of reps.
Benefits of Cluster Sets
- Increased Total Volume: By breaking a set into clusters, you can perform more reps with a given weight, increasing the total volume and workload on your muscles.
- Enhanced Muscle Growth: Higher training volumes are strongly associated with muscle hypertrophy. Cluster sets enable you to achieve greater volumes without compromising form.
- Improved Strength Gains: Lifting heavier weights for more reps enhances neural adaptations and strength.
- Better Technique: Short rest periods help maintain better form and technique throughout the set, reducing the risk of injury.
- Overcoming Plateaus: Cluster sets provide a novel stimulus to your muscles, helping you break through training plateaus.
How to Implement Cluster Sets
To effectively incorporate cluster sets into your training regimen, follow these guidelines:
- Choose the Right Exercises: Compound movements such as squats, deadlifts, bench presses, and rows are ideal for cluster sets because they recruit multiple muscle groups and allow for heavier loads.
- Determine Your Reps and Clusters: Decide on the total number of reps you want to perform and how to break them into clusters. Common configurations include:
- 4×2 Cluster: 4 clusters of 2 reps (total of 8 reps)
- 3×3 Cluster: 3 clusters of 3 reps (total of 9 reps)
- 2×4 Cluster: 2 clusters of 4 reps (total of 8 reps)
- Set Your Rest Intervals: Short rest periods (10-30 seconds) between clusters allow partial recovery, enabling you to maintain intensity. Adjust the rest intervals based on your fitness level and goals.
- Select an Appropriate Weight: Choose a weight that you can lift for the total number of reps in a traditional set, but that challenges you when divided into clusters. Typically, this will be around 80-90% of your 1RM (one-rep max).
- Monitor and Adjust: Track your performance and adjust the weight, rest intervals, or cluster configuration as needed to continue progressing.
Sample Cluster Set Workout
Here’s an example of how you can incorporate cluster sets into your training routine:
Workout A: Upper Body Cluster Sets
- Bench Press:
- 4×2 Cluster Set (4 clusters of 2 reps)
- Rest 15 seconds between clusters
- Rest 2-3 minutes between sets
- Perform 3 sets
- Bent-Over Rows:
- 3×3 Cluster Set (3 clusters of 3 reps)
- Rest 20 seconds between clusters
- Rest 2-3 minutes between sets
- Perform 3 sets
- Overhead Press:
- 4×2 Cluster Set (4 clusters of 2 reps)
- Rest 15 seconds between clusters
- Rest 2-3 minutes between sets
- Perform 3 sets
- Pull-Ups:
- 3×3 Cluster Set (3 clusters of 3 reps)
- Rest 20 seconds between clusters
- Rest 2-3 minutes between sets
- Perform 3 sets
Workout B: Lower Body Cluster Sets
- Squats:
- 4×2 Cluster Set (4 clusters of 2 reps)
- Rest 15 seconds between clusters
- Rest 2-3 minutes between sets
- Perform 3 sets
- Deadlifts:
- 3×3 Cluster Set (3 clusters of 3 reps)
- Rest 20 seconds between clusters
- Rest 2-3 minutes between sets
- Perform 3 sets
- Leg Press:
- 4×2 Cluster Set (4 clusters of 2 reps)
- Rest 15 seconds between clusters
- Rest 2-3 minutes between sets
- Perform 3 sets
- Lunges:
- 2×4 Cluster Set (2 clusters of 4 reps per leg)
- Rest 20 seconds between clusters
- Rest 2-3 minutes between sets
- Perform 3 sets
Tips for Success with Cluster Sets
- Start Conservatively: Begin with lighter weights and shorter rest periods to get accustomed to the new training style.
- Focus on Form: Ensure proper technique, especially when lifting heavier weights.
- Listen to Your Body: Adjust the weights, reps, and rest intervals based on how your body responds to avoid overtraining.
- Periodize Your Training: Incorporate cluster sets into your routine periodically to provide a fresh stimulus and prevent adaptation.
By incorporating cluster sets into your training regimen, you can push past your limits, increase your strength, and stimulate significant muscle growth. This advanced technique can help you break through plateaus and continue making progress in your fitness journey.
4. Blood Flow Restriction (BFR) Training
BFR training involves wrapping a device around the limb you’re working on to restrict blood flow. This technique allows you to use lighter weights while still achieving significant muscle hypertrophy. It’s particularly useful for those recovering from injuries or looking to add volume without excessive strain.
Blood Flow Restriction (BFR) training is an advanced technique that has gained popularity for its ability to stimulate muscle growth and strength gains with lighter loads. This method involves restricting blood flow to the muscles during exercise, creating an environment that promotes hypertrophy and strength without the need for heavy weights. Here’s an in-depth look at how BFR training works, its benefits, and how to implement it effectively.
What is BFR Training?
BFR training involves the use of cuffs or bands to partially restrict venous blood flow from a working muscle while maintaining arterial inflow. This restriction creates a hypoxic environment (low oxygen) within the muscle, which can enhance muscle growth and strength adaptations.
How BFR Training Works
The mechanism behind BFR training involves several physiological responses:
- Metabolic Stress: The restricted blood flow leads to the accumulation of metabolites (e.g., lactate), which is a potent stimulus for muscle growth.
- Cell Swelling: Increased metabolic byproducts and fluid retention cause the muscle cells to swell, triggering anabolic signaling pathways.
- Fiber Recruitment: The hypoxic environment forces the recruitment of fast-twitch muscle fibers, which are more prone to hypertrophy.
- Hormonal Response: BFR training can significantly increase the release of growth hormones, further enhancing muscle growth and recovery.
Benefits of BFR Training
- Muscle Hypertrophy: BFR training can lead to significant increases in muscle size, even when using light weights (20-30% of 1RM).
- Strength Gains: While typically associated with muscle growth, BFR training also contributes to strength improvements.
- Reduced Joint Stress: Using lighter weights reduces the load on joints and connective tissues, making BFR training ideal for those with injuries or joint issues.
- Enhanced Rehabilitation: BFR training is effective for rehabilitation settings, allowing patients to maintain muscle mass and strength while avoiding heavy loads that might exacerbate injuries.
- Time Efficiency: BFR sessions are often shorter, providing a time-efficient workout option.
Implementing BFR Training
To effectively incorporate BFR training into your routine, follow these guidelines:
- Choose the Right Equipment: Use proper BFR cuffs or bands that are specifically designed for this purpose. Avoid makeshift solutions that might not provide consistent pressure.
- Correct Placement: For upper body exercises, place the bands around the top of your arms (just below the shoulder). For lower body exercises, place the bands at the top of your thighs (just below the hip).
- Proper Tightness: The bands should be tight enough to restrict venous blood flow but not so tight that arterial inflow is significantly impeded. On a scale of 1 to 10, the tightness should be around 7.
- Select Appropriate Exercises: BFR training can be applied to a variety of exercises, including:
- Upper Body: Bicep curls, tricep extensions, shoulder presses, bench presses.
- Lower Body: Squats, leg presses, leg extensions, hamstring curls.
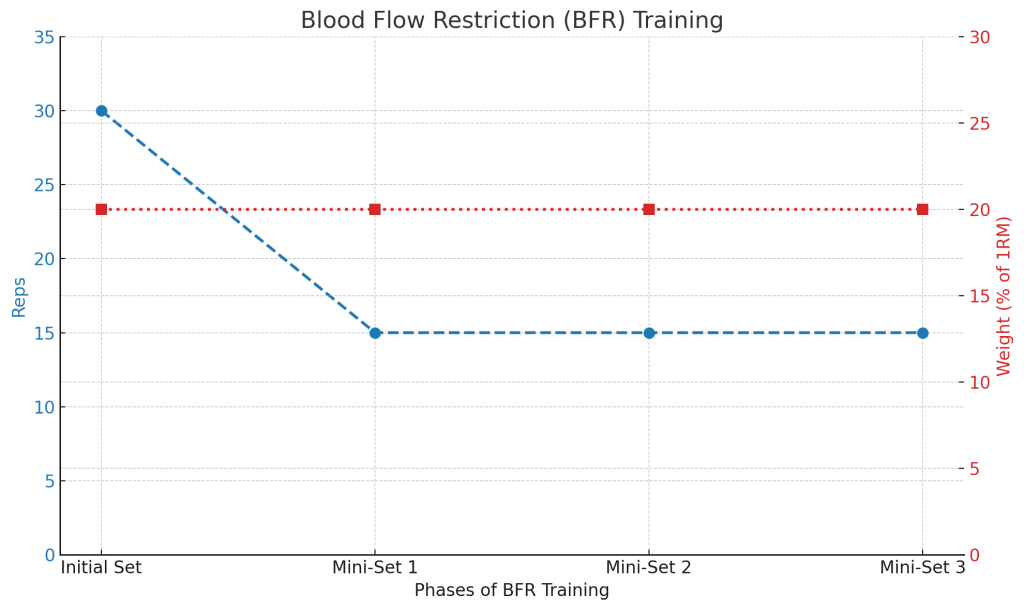
- Use Light Weights: Perform exercises with 20-30% of your 1RM. The focus is on volume and metabolic stress rather than lifting heavy.
- Repetition Scheme: Aim for higher reps with shorter rest periods. A common protocol is:
- 30 reps for the first set, followed by 15 reps for the next three sets, with 30-second rest intervals between sets.
- Duration: Each BFR session should last around 15-20 minutes to avoid excessive muscle damage.
Sample BFR Training Workout
Here’s a sample BFR training workout for both upper and lower body:
Upper Body BFR Workout:
- Bicep Curls:
- 4 sets (30 reps, then 3 sets of 15 reps)
- Rest 30 seconds between sets
- Tricep Extensions:
- 4 sets (30 reps, then 3 sets of 15 reps)
- Rest 30 seconds between sets
- Shoulder Press:
- 4 sets (30 reps, then 3 sets of 15 reps)
- Rest 30 seconds between sets
- Chest Press:
- 4 sets (30 reps, then 3 sets of 15 reps)
- Rest 30 seconds between sets
Lower Body BFR Workout:
- Leg Extensions:
- 4 sets (30 reps, then 3 sets of 15 reps)
- Rest 30 seconds between sets
- Leg Curls:
- 4 sets (30 reps, then 3 sets of 15 reps)
- Rest 30 seconds between sets
- Leg Press:
- 4 sets (30 reps, then 3 sets of 15 reps)
- Rest 30 seconds between sets
- Bodyweight Squats:
- 4 sets (30 reps, then 3 sets of 15 reps)
- Rest 30 seconds between sets
Tips for Effective BFR Training
- Stay Hydrated: BFR training can be intense, so ensure you stay well-hydrated.
- Listen to Your Body: If you experience numbness, tingling, or excessive pain, stop immediately and check the band tightness and placement.
- Consistency: Like any training method, consistency is key. Incorporate BFR sessions into your routine 2-3 times per week.
- Combine with Traditional Training: BFR training is best used as a supplement to your regular strength training program. Incorporate it into specific sessions or phases of your training cycle.
By integrating BFR training into your workout regimen, you can achieve significant muscle growth and strength gains while minimizing the risk of injury. This advanced technique offers a versatile and effective approach to enhancing your fitness journey.
5. Eccentric Overload
Focusing on the eccentric (lowering) phase of your lifts can lead to greater muscle damage and growth. Incorporate techniques like negative reps, where you use a weight heavier than your max and focus solely on controlling the lowering phase with a spotter’s help.
Eccentric overload is an advanced training technique that focuses on the eccentric phase (the lowering or lengthening phase) of a movement. This method leverages the fact that muscles can handle more weight eccentrically than concentrically (lifting phase), allowing you to maximize muscle damage and growth. Incorporating eccentric overload into your routine can break through plateaus and significantly enhance both strength and hypertrophy.
Understanding Eccentric Overload
Eccentric movements are crucial for muscle development. They involve lengthening the muscle under tension, which creates more micro-tears in the muscle fibers than concentric movements. This increased muscle damage stimulates greater repair and growth during recovery.
Benefits of Eccentric Overload
- Increased Muscle Hypertrophy: Eccentric movements create more muscle damage, leading to greater muscle growth during recovery.
- Enhanced Strength: Training eccentrically with heavier loads improves neural adaptations and muscle fiber recruitment.
- Improved Flexibility: Eccentric training enhances muscle lengthening, which can improve flexibility and reduce injury risk.
- Better Technique: Focusing on the eccentric phase can improve your overall lifting technique and control.
Implementing Eccentric Overload
To effectively incorporate eccentric overload into your training regimen, follow these guidelines:
- Select Appropriate Exercises: Compound movements such as squats, deadlifts, bench presses, and pull-ups are ideal for eccentric overload due to their ability to handle heavier weights.
- Use Heavier Weights: For eccentric overload, use weights that are 110-130% of your one-rep max (1RM). You will need a spotter or assistance for the concentric phase.
- Control the Descent: Focus on lowering the weight slowly and with control. Aim for a 3-6 second eccentric phase to maximize muscle tension.
- Use Negative Reps: Perform the eccentric phase with a heavier weight and have a spotter help you lift the weight back up concentrically. This method is effective for exercises like bench presses and pull-ups.
- Incorporate Eccentric-Only Sets: Occasionally perform sets that focus solely on the eccentric phase. For example, lift the weight with assistance, then lower it slowly under control.
- Combine with Traditional Training: Integrate eccentric overload into your regular training routine, using it for specific sets or cycles to enhance overall gains.
Sample Eccentric Overload Workout
Here’s an example of how you can incorporate eccentric overload into a full-body workout:
Workout A: Upper Body Eccentric Overload
- Bench Press:
- 4 sets of 3-5 reps (3-5 second eccentric phase)
- Use 110-130% of your 1RM
- Have a spotter assist with the concentric phase
- Pull-Ups:
- 4 sets of 3-5 reps (4-6 second eccentric phase)
- Use added weight if possible
- Perform negatives if unable to complete concentric reps
- Overhead Press:
- 4 sets of 3-5 reps (3-5 second eccentric phase)
- Use 110-130% of your 1RM
- Have a spotter assist with the concentric phase
- Barbell Rows:
- 4 sets of 3-5 reps (4-6 second eccentric phase)
- Use a challenging weight
- Focus on controlling the descent
Workout B: Lower Body Eccentric Overload
- Squats:
- 4 sets of 3-5 reps (4-6 second eccentric phase)
- Use 110-130% of your 1RM
- Use safety bars or a spotter for assistance
- Deadlifts:
- 4 sets of 3-5 reps (4-6 second eccentric phase)
- Use a challenging weight
- Focus on controlling the descent
- Leg Press:
- 4 sets of 3-5 reps (4-6 second eccentric phase)
- Use a heavy load
- Focus on a slow and controlled descent
- Lunges:
- 4 sets of 3-5 reps per leg (4-6 second eccentric phase)
- Use dumbbells or a barbell
- Control the lowering phase of each lunge
Tips for Effective Eccentric Overload Training
- Warm-Up Thoroughly: Eccentric training places significant stress on muscles and joints. Ensure you are properly warmed up to prevent injuries.
- Start Conservatively: Begin with lighter weights and shorter eccentric phases to allow your muscles and joints to adapt.
- Prioritize Recovery: Eccentric training causes more muscle damage, so prioritize recovery with adequate sleep, nutrition, and rest days.
- Listen to Your Body: Eccentric training can be taxing. Pay attention to any signs of excessive fatigue or discomfort and adjust your training accordingly.
- Integrate Periodically: Use eccentric overload in specific phases or cycles of your training program to avoid overtraining and maximize benefits.
By incorporating eccentric overload into your training routine, you can stimulate greater muscle growth and strength gains, break through plateaus, and enhance your overall performance. This advanced technique, when used correctly, offers a powerful tool for achieving your fitness goals.
6. Variable Resistance Training
Using tools like resistance bands or chains can change the resistance profile of your lifts, making them harder at the top and easier at the bottom. This method helps in targeting different muscle fibers and can lead to improved strength and hypertrophy.

Distribution of different types of equipment used:
- Resistance Bands: 40%
- Chains: 25%
- Variable Weights: 20%
- Elastic Tubes: 15%
Variable resistance training (VRT) is an advanced strength training technique that involves changing the resistance throughout the range of motion of an exercise. This approach helps in targeting different muscle fibers and improving overall strength and hypertrophy. By incorporating tools like resistance bands or chains, you can make exercises more challenging and effective.
What is Variable Resistance Training?
Variable resistance training uses resistance that changes at different points in the range of motion. Unlike traditional free weights that provide constant resistance, VRT ensures that the resistance increases or decreases as you move through the lift. This method aligns the resistance with the natural strength curve of the exercise, maximizing muscle engagement and strength gains.
Benefits of Variable Resistance Training
- Improved Strength: VRT allows you to lift heavier weights at stronger points in the range of motion, leading to greater strength gains.
- Enhanced Muscle Activation: By varying resistance, more muscle fibers are recruited, particularly at the points where you are strongest.
- Injury Prevention: VRT can reduce the stress on joints and connective tissues at weaker points, lowering the risk of injury.
- Better Technique: The changing resistance requires greater control and stabilization, improving overall lifting technique.
- Plateau Busting: VRT provides a new stimulus for muscles, helping to break through strength and hypertrophy plateaus.
Implementing Variable Resistance Training
To effectively incorporate VRT into your training regimen, follow these guidelines:
- Use the Right Equipment: Resistance bands and chains are the most common tools for VRT. Ensure they are of high quality and appropriate for your strength level.
- Choose the Right Exercises: Compound movements like squats, deadlifts, bench presses, and rows are ideal for VRT as they benefit most from the varying resistance.
- Adjust the Resistance Appropriately: Start with lighter resistance bands or chains and progressively increase the load as you become more comfortable with the technique.
- Integrate with Traditional Training: Combine VRT with traditional weight training to ensure a well-rounded approach and continuous progress.
How to Use Resistance Bands and Chains
Resistance Bands:
- Attachment: Secure the bands to the barbell or dumbbells, and anchor the other end to a stable point (e.g., the base of a squat rack).
- Positioning: Ensure the bands are taut at the starting position of the exercise and increase tension as you move through the range of motion.
- Examples:
- Bench Press: Attach bands to the barbell and anchor them to the floor or a low point on the rack. As you press the bar, the resistance increases.
- Squats: Attach bands to the barbell and anchor them to the floor. As you rise from the squat, the tension in the bands increases, making the top portion of the lift more challenging.
Chains:
- Attachment: Drape chains over the barbell, ensuring they touch the ground at the bottom of the lift and lift off as you rise.
- Positioning: Adjust the length of the chains so that more links are lifted off the ground as you move through the range of motion.
- Examples:
- Deadlifts: Place chains on the barbell so that they lift off the ground as you pull the bar up, increasing resistance as you approach lockout.
- Overhead Press: Attach chains to the barbell. As you press the weight overhead, more chain links lift off the ground, increasing resistance.
Sample Variable Resistance Training Workout
Here’s a sample full-body VRT workout using resistance bands and chains:
Upper Body:
- Bench Press with Bands:
- 4 sets of 6-8 reps
- Attach bands to the barbell and anchor them to the floor or low point on the rack.
- Bent-Over Rows with Chains:
- 4 sets of 8-10 reps
- Drape chains over the barbell, ensuring they lift off the ground as you row.
- Overhead Press with Bands:
- 4 sets of 6-8 reps
- Attach bands to the barbell and anchor them to the floor.
- Pull-Ups with Bands:
- 4 sets of 8-10 reps
- Attach bands to your waist or feet for added resistance.
Lower Body:
- Squats with Chains:
- 4 sets of 6-8 reps
- Place chains on the barbell, ensuring they lift off the ground as you rise.
- Deadlifts with Bands:
- 4 sets of 6-8 reps
- Attach bands to the barbell and anchor them to the floor or low point on the rack.
- Leg Press with Bands:
- 4 sets of 10-12 reps
- Attach bands to the leg press machine for increased resistance at the top of the movement.
- Lunges with Bands:
- 4 sets of 10-12 reps per leg
- Attach bands to dumbbells or a barbell for added resistance.
Tips for Effective Variable Resistance Training
- Warm-Up Thoroughly: VRT can be intense, so ensure you are properly warmed up to prevent injuries.
- Focus on Form: Maintain proper technique, especially as the resistance changes throughout the lift.
- Progress Gradually: Start with lighter bands or chains and progressively increase the resistance as you adapt.
- Monitor Recovery: VRT can be demanding, so prioritize recovery with adequate rest, nutrition, and sleep.
- Listen to Your Body: Pay attention to any signs of excessive fatigue or discomfort and adjust your training accordingly.
By incorporating variable resistance training into your routine, you can maximize muscle growth, enhance strength, and improve overall performance. This advanced technique offers a versatile and effective approach to achieving your fitness goals.
7. Drop Sets Exercises
Drop sets involve continuing an exercise with a lighter weight once you reach failure with a heavier weight. Mechanical drop sets take this concept further by changing the exercise slightly to a version you can perform more easily after reaching failure. Both techniques maximize muscle fatigue and growth.
| Exercise | Initial Weight (% of 1RM) | Initial Reps | Drop 1 Weight (% of 1RM) | Drop 1 Reps | Drop 2 Weight (% of 1RM) | Drop 2 Reps |
| Bicep Curls | 75 | 10 | 60 | 8 | 50 | 6 |
| Leg Press | 80 | 12 | 65 | 10 | 50 | 8 |
| Chest Press | 70 | 10 | 55 | 8 | 45 | 6 |
| Shoulder Press | 65 | 8 | 50 | 6 | 40 | 5 |
Drop sets and mechanical drop sets are advanced resistance training techniques designed to maximize muscle fatigue and hypertrophy. These methods push your muscles beyond their usual limits, leading to increased muscle growth and endurance. By understanding and implementing these techniques, you can break through plateaus and enhance your overall muscle-building efforts.
What Are Drop Sets?
A drop set involves performing an exercise to failure with a given weight, then immediately reducing the weight and continuing to perform more reps until failure again. This process can be repeated multiple times, with each subsequent set referred to as a “drop.”
Example:
- Start with a weight you can lift for 8-10 reps.
- Perform the exercise to failure.
- Reduce the weight by 20-30%.
- Continue performing reps to failure.
- Repeat the process for 2-3 drops.
Benefits of Drop Sets
- Maximized Muscle Fatigue: Drop sets extend the time under tension for your muscles, leading to greater muscle fatigue and, subsequently, hypertrophy.
- Increased Training Volume: By adding more reps with lighter weights after initial failure, you increase the overall volume of your workout.
- Efficient Workouts: Drop sets allow you to achieve a high level of muscle fatigue in a shorter amount of time compared to traditional sets.
- Variety and Challenge: Incorporating drop sets can add variety to your routine, keeping workouts challenging and engaging.
How to Implement Drop Sets
To effectively incorporate drop sets into your training regimen, follow these guidelines:
- Choose the Right Exercises: Compound movements (e.g., bench press, squats) and isolation exercises (e.g., bicep curls, tricep extensions) both work well with drop sets.
- Start with a Moderate Weight: Use a weight that allows you to reach muscle failure within 8-10 reps for the initial set.
- Adjust the Weight Appropriately: Reduce the weight by 20-30% for each drop to ensure you can continue performing reps to failure.
- Limit the Number of Drops: Typically, 2-3 drops per set are sufficient to achieve the desired level of muscle fatigue.
- Use Sparingly: Due to their intensity, incorporate drop sets 1-2 times per week per muscle group to avoid overtraining.
What Are Mechanical Drop Sets?
Mechanical drop sets are a variation of traditional drop sets that involve changing the exercise to a mechanically easier variation instead of reducing the weight. This allows you to continue working the same muscle group to failure, exploiting different angles and positions.
| Exercise | Initial Weight (% of 1RM) | Reps |
| Incline Bench Press | 70 | 10 |
| Flat Bench Press | 65 | 8 |
| Decline Bench Press | 60 | 6 |
Example:
- Start with a challenging exercise variation (e.g., incline bench press).
- Perform the exercise to failure.
- Switch to a slightly easier variation (e.g., flat bench press).
- Continue performing reps to failure.
- Repeat with an even easier variation if desired (e.g., decline bench press).
Benefits of Mechanical Drop Sets
- Continuous Muscle Engagement: By changing the exercise variation, you maintain muscle engagement without reducing weight.
- Target Multiple Muscle Fibers: Different variations can target different parts of the muscle, leading to more balanced growth.
- Improved Technique and Form: Mechanical drops can help you maintain proper form by adjusting to easier variations as fatigue sets in.
- Increased Muscle Confusion: Changing exercises prevents your muscles from adapting too quickly, promoting continuous growth.
How to Implement Mechanical Drop Sets
To effectively incorporate mechanical drop sets into your training regimen, follow these guidelines:
- Choose the Right Exercises: Select exercises that have multiple variations targeting the same muscle group (e.g., different types of bench presses or curls).
- Plan Your Variations: Sequence your exercises from hardest to easiest to ensure a smooth transition.
- Perform to Failure: As with traditional drop sets, perform each variation to failure before switching to the next.
- Limit the Number of Variations: Typically, 2-3 variations per set are sufficient to achieve the desired level of muscle fatigue.
- Use Strategically: Integrate mechanical drop sets into your routine for specific muscle groups 1-2 times per week.
Sample Workouts
Drop Set Workout:
- Bicep Curls:
- Start with a weight you can curl for 10 reps.
- Perform to failure.
- Reduce the weight by 20-30%.
- Continue to failure.
- Repeat for 2 drops.
- Leg Press:
- Start with a weight you can press for 12 reps.
- Perform to failure.
- Reduce the weight by 20-30%.
- Continue to failure.
- Repeat for 2 drops.
Mechanical Drop Set Workout:
- Chest Press:
- Start with incline bench press.
- Perform to failure.
- Switch to flat bench press.
- Continue to failure.
- Switch to decline bench press.
- Continue to failure.
- Shoulder Press:
- Start with seated shoulder press.
- Perform to failure.
- Switch to standing shoulder press.
- Continue to failure.
- Switch to Arnold press.
- Continue to failure.
Tips for Effective Drop Sets and Mechanical Drop Sets
- Warm-Up Thoroughly: Both techniques are intense and require a proper warm-up to prevent injuries.
- Focus on Form: Maintain proper form throughout, even as you fatigue. Poor form can lead to injuries.
- Manage Volume: Due to their intensity, incorporate these techniques judiciously to avoid overtraining.
- Prioritize Recovery: Ensure adequate recovery with proper nutrition, hydration, and rest.
- Listen to Your Body: Adjust the frequency and intensity based on how your body responds to avoid excessive fatigue or injury.
By incorporating drop sets and mechanical drop sets into your training regimen, you can significantly enhance muscle growth and strength. These advanced techniques provide a powerful tool to push your limits, break through plateaus, and achieve your fitness goals.
8. Occlusion Training
Similar to BFR, occlusion training involves restricting blood flow, but it’s more commonly applied through practical means like using knee wraps or elastic bands. This technique helps increase muscle size and endurance with lighter loads, making it a safer option for heavy lifters.

Distribution of its usage between upper and lower body exercises:
- Upper Body Exercises: 45%
- Lower Body Exercises: 55%
Occlusion training, also known as Blood Flow Restriction (BFR) training, is a cutting-edge technique that restricts blood flow to the muscles during exercise. This method enables significant muscle growth and strength gains with lighter loads, making it a valuable tool for athletes, bodybuilders, and those recovering from injuries.
What is Occlusion Training?
Occlusion training involves using bands, wraps, or cuffs to partially restrict venous blood flow from a working muscle while maintaining arterial inflow. This creates a hypoxic (low oxygen) environment, which stimulates muscle growth even with light weights. The technique can be applied to both upper and lower body exercises.
Benefits of Occlusion Training
- Muscle Hypertrophy: BFR training promotes muscle growth by increasing metabolic stress, which triggers anabolic signaling pathways.
- Strength Gains: Even with lighter loads, BFR can enhance strength, making it beneficial for those who cannot lift heavy weights due to injuries or joint issues.
- Reduced Joint Stress: Lifting lighter weights reduces the strain on joints and connective tissues, helping prevent injuries.
- Enhanced Recovery: BFR training can be used in rehabilitation settings to maintain muscle mass and strength without heavy loading.
- Time Efficiency: Shorter sessions with lighter weights can achieve similar results to traditional heavy lifting, making workouts more time-efficient.
How Does Occlusion Training Work?
The effectiveness of occlusion training is due to several physiological responses:
- Metabolic Stress: Restricting blood flow increases the accumulation of metabolites (like lactate), creating a potent stimulus for muscle growth.
- Cell Swelling: The hypoxic environment causes cells to swell, activating anabolic pathways.
- Fiber Recruitment: Reduced oxygen availability forces the body to recruit fast-twitch muscle fibers, which have greater growth potential.
- Hormonal Response: BFR training significantly increases the release of growth hormones, further enhancing muscle growth.
Implementing Occlusion Training
To effectively incorporate occlusion training into your routine, follow these guidelines:
- Use Proper Equipment: Use specialized BFR cuffs or bands designed for occlusion training. Avoid makeshift solutions, as they may not provide consistent pressure.
- Correct Placement: For upper body exercises, place the bands around the top of your arms, just below the shoulder. For lower body exercises, place them at the top of your thighs, just below the hip.
- Proper Tightness: The bands should be tight enough to restrict venous return but not so tight that they completely cut off arterial blood flow. On a scale of 1 to 10, aim for a tightness level of about 7.
- Select Appropriate Exercises: Occlusion training can be applied to a variety of exercises, including:
- Upper Body: Bicep curls, tricep extensions, shoulder presses, bench presses.
- Lower Body: Squats, leg presses, leg extensions, hamstring curls.
- Use Light Weights: Perform exercises with 20-30% of your 1RM (one-rep max). The focus is on volume and metabolic stress rather than lifting heavy.
- Repetition Scheme: Aim for high reps with short rest periods. A common protocol is:
- 30 reps for the first set, followed by 15 reps for the next three sets, with 30-second rest intervals between sets.
- Session Duration: Each BFR session should last around 15-20 minutes to avoid excessive muscle damage.
Sample Occlusion Training Workout
Upper Body BFR Workout:
- Bicep Curls:
- 4 sets (30 reps, then 3 sets of 15 reps)
- Rest 30 seconds between sets
- Tricep Extensions:
- 4 sets (30 reps, then 3 sets of 15 reps)
- Rest 30 seconds between sets
- Shoulder Press:
- 4 sets (30 reps, then 3 sets of 15 reps)
- Rest 30 seconds between sets
- Chest Press:
- 4 sets (30 reps, then 3 sets of 15 reps)
- Rest 30 seconds between sets
Lower Body BFR Workout:
- Leg Extensions:
- 4 sets (30 reps, then 3 sets of 15 reps)
- Rest 30 seconds between sets
- Leg Curls:
- 4 sets (30 reps, then 3 sets of 15 reps)
- Rest 30 seconds between sets
- Leg Press:
- 4 sets (30 reps, then 3 sets of 15 reps)
- Rest 30 seconds between sets
- Bodyweight Squats:
- 4 sets (30 reps, then 3 sets of 15 reps)
- Rest 30 seconds between sets
Tips for Effective Occlusion Training
- Warm-Up Thoroughly: BFR training is intense, so ensure you are properly warmed up to prevent injuries.
- Stay Hydrated: Drink plenty of water before and after your BFR sessions to support muscle recovery.
- Monitor Tightness: Ensure the bands are tight enough to restrict blood flow but not so tight that they cause pain or numbness.
- Listen to Your Body: If you experience excessive pain, discomfort, or numbness, stop the exercise and adjust the band tightness.
- Prioritize Recovery: Because BFR training can be intense, prioritize recovery with proper nutrition, hydration, and rest.
Precautions and Considerations
- Medical Conditions: Individuals with cardiovascular issues, high blood pressure, or other medical conditions should consult a healthcare professional before attempting BFR training.
- Proper Technique: Ensure you are familiar with the exercises and can maintain proper form, even as fatigue sets in.
- Frequency: Incorporate BFR training 2-3 times per week per muscle group to avoid overtraining and maximize recovery.
By integrating occlusion training into your workout regimen, you can achieve significant muscle growth and strength gains while minimizing the risk of injury. This advanced technique offers a versatile and effective approach to enhancing your fitness journey, especially for those looking to maximize results with lighter weights.
9. Advanced Supersets and Giant Sets
Supersets (performing two exercises back-to-back) and giant sets (three or more exercises) are not just for beginners. Advanced variations, such as agonist-antagonist supersets (e.g., biceps and triceps) or pre-exhaustion sets (isolating a muscle group before compound exercises), can further enhance muscle fatigue and growth.
Supersets and giant sets are effective training techniques that involve performing multiple exercises back-to-back with minimal rest. These methods increase workout intensity, boost muscle hypertrophy, and improve overall conditioning. For advanced lifters, there are specific variations and strategies to further challenge the body and break through plateaus.
What are Supersets and Giant Sets?
Supersets involve performing two exercises consecutively without rest. They can target the same muscle group (agonist superset) or opposing muscle groups (antagonist superset).
Giant Sets extend this concept by incorporating three or more exercises performed in sequence with minimal rest, often targeting the same muscle group to maximize fatigue and pump.
Benefits of Supersets and Giant Sets
- Increased Training Intensity: Performing exercises back-to-back elevates heart rate and keeps the muscles under tension for longer periods.
- Time Efficiency: These techniques allow you to complete more work in less time, making them ideal for those with busy schedules.
- Enhanced Muscle Hypertrophy: The increased volume and intensity promote greater muscle growth.
- Improved Muscular Endurance: Reducing rest periods challenges your muscles’ endurance capabilities.
- Variety and Challenge: Supersets and giant sets add variety to your routine, keeping workouts engaging and challenging.
Types of Advanced Supersets
- Agonist Supersets:
- Target the same muscle group with two different exercises to maximize fatigue.
- Example: Perform a set of barbell bench presses followed immediately by dumbbell flyes.
- Antagonist Supersets:
- Pair exercises for opposing muscle groups, allowing one to rest while the other works.
- Example: Perform a set of bicep curls followed by tricep extensions.
- Pre-Exhaustion Supersets:
- Start with an isolation exercise to pre-fatigue a muscle, then follow with a compound movement.
- Example: Perform a set of leg extensions followed by squats.
- Post-Exhaustion Supersets:
- Begin with a compound movement to recruit maximum muscle fibers, then isolate the muscle with a single-joint exercise.
- Example: Perform a set of bench presses followed by dumbbell flyes.
- Non-Competing Supersets:
- Pair exercises for different muscle groups to maintain overall workout intensity without compromising form.
- Example: Perform a set of squats followed by pull-ups.
Implementing Advanced Supersets
To effectively incorporate advanced supersets into your training regimen, follow these guidelines:
- Choose Complementary Exercises: Select exercises that pair well together to target the desired muscle groups effectively.
- Monitor Rest Periods: Keep rest periods between exercises minimal (15-30 seconds) to maintain intensity.
- Prioritize Form: Ensure proper form and technique, especially as fatigue sets in.
- Adjust Weights Accordingly: Use weights that challenge you but allow for proper execution of both exercises in the superset.
Types of Advanced Giant Sets
- Single Muscle Group Giant Sets:
- Perform three or more exercises targeting the same muscle group in sequence to fully exhaust the muscles.
- Example: Perform a set of incline bench presses, followed by flat bench presses, then decline bench presses.
- Full-Body Giant Sets:
- Incorporate exercises targeting different muscle groups for a comprehensive workout.
- Example: Perform a set of squats, followed by pull-ups, then push-ups, and finish with deadlifts.
- Compound Movement Giant Sets:
- Use multiple compound exercises to enhance overall strength and conditioning.
- Example: Perform a set of deadlifts, followed by overhead presses, then rows, and finish with lunges.
- Isolation Movement Giant Sets:
- Focus on isolation exercises to target specific muscles for detailed work and enhanced definition.
- Example: Perform a set of leg curls, followed by leg extensions, then calf raises, and finish with hip thrusts.
Implementing Advanced Giant Sets
To effectively incorporate advanced giant sets into your training regimen, follow these guidelines:
- Plan Your Sequence: Organize exercises logically to maximize muscle engagement and minimize rest.
- Keep Rest Minimal: Limit rest between exercises to 15-30 seconds to maintain intensity and elevate heart rate.
- Use Proper Technique: Prioritize form and control throughout each exercise to prevent injury and maximize effectiveness.
- Adjust Weights Appropriately: Select weights that allow for the completion of all exercises in the giant set with proper form.
Sample Workouts
Advanced Superset Workout:
- Chest and Back Superset:
- Barbell Bench Press: 4 sets of 8-10 reps
- Pull-Ups: 4 sets of 8-10 reps
- Rest 60 seconds between supersets
- Legs Superset:
- Squats: 4 sets of 8-10 reps
- Romanian Deadlifts: 4 sets of 8-10 reps
- Rest 60 seconds between supersets
- Shoulders and Arms Superset:
- Overhead Press: 4 sets of 8-10 reps
- Lateral Raises: 4 sets of 12-15 reps
- Rest 60 seconds between supersets
Advanced Giant Set Workout:
- Upper Body Giant Set:
- Incline Dumbbell Press: 3 sets of 10-12 reps
- Bent-Over Rows: 3 sets of 10-12 reps
- Dumbbell Flyes: 3 sets of 12-15 reps
- Seated Rows: 3 sets of 12-15 reps
- Rest 2 minutes between giant sets
- Lower Body Giant Set:
- Leg Press: 3 sets of 12-15 reps
- Leg Curls: 3 sets of 12-15 reps
- Lunges: 3 sets of 12 reps per leg
- Calf Raises: 3 sets of 15-20 reps
- Rest 2 minutes between giant sets
- Full-Body Giant Set:
- Deadlifts: 3 sets of 8-10 reps
- Overhead Press: 3 sets of 8-10 reps
- Pull-Ups: 3 sets of 10-12 reps
- Push-Ups: 3 sets of 15-20 reps
- Rest 2 minutes between giant sets
Tips for Effective Advanced Supersets and Giant Sets
- Warm-Up Thoroughly: Both techniques are intense, so ensure you are properly warmed up to prevent injuries.
- Focus on Form: Maintain proper technique, especially as fatigue sets in.
- Listen to Your Body: Adjust the intensity and volume based on how your body responds to avoid overtraining.
- Prioritize Recovery: Ensure adequate recovery with proper nutrition, hydration, and rest.
By incorporating advanced supersets and giant sets into your training regimen, you can maximize muscle growth, enhance strength, and improve overall conditioning. These techniques offer a powerful way to challenge your body, break through plateaus, and achieve your fitness goals.
10. Rest-Pause Training
Rest-pause training involves breaking your set into several mini-sets with short rest periods (10-15 seconds) in between. This method allows you to perform more reps with the same weight, increasing your overall volume and intensity, which are crucial for muscle growth.
Rest-pause training is an advanced lifting technique designed to increase muscle strength and hypertrophy by incorporating brief rest intervals within a set. This method allows you to push past failure, increase training volume, and maximize muscle fiber recruitment. Here’s an in-depth look at how rest-pause training works, its benefits, and how to implement it effectively.
What is Rest-Pause Training?
Rest-pause training involves performing a set of an exercise to near failure, taking a short rest (typically 10-20 seconds), and then continuing the set for additional reps. This process can be repeated multiple times, allowing you to perform more reps with a given weight than you could in a traditional straight set.
Example:
- Perform a set of bench presses for 8 reps to near failure.
- Rest for 15 seconds.
- Perform additional reps (e.g., 3-4 more).
- Rest for another 15 seconds.
- Perform a final few reps until failure.
Benefits of Rest-Pause Training
- Increased Training Volume: Rest-pause training allows for more repetitions with a given weight, increasing the overall volume of your workout.
- Enhanced Muscle Hypertrophy: The increased volume and intensity promote greater muscle growth.
- Improved Strength: By pushing past failure, rest-pause training enhances strength gains and neural adaptations.
- Efficient Workouts: This method is time-efficient, allowing you to achieve high levels of muscle fatigue in a shorter period.
- Greater Muscle Fiber Recruitment: The repeated efforts after short rests recruit more muscle fibers, particularly the fast-twitch fibers that are most prone to hypertrophy.
Implementing Rest-Pause Training
To effectively incorporate rest-pause training into your routine, follow these guidelines:
- Choose the Right Exercises: Compound movements like squats, deadlifts, bench presses, and rows are ideal for rest-pause training due to their ability to handle heavier loads and recruit multiple muscle groups.
- Determine the Weight and Reps: Use a weight that allows you to perform 6-8 reps to near failure in the initial set. Adjust the weight as needed based on your experience and strength levels.
- Short Rest Intervals: Keep rest intervals brief (10-20 seconds) to maintain intensity and muscle engagement.
- Repeat the Process: Perform additional reps after each rest period until you reach a total of 3-4 mini-sets.
- Limit Frequency: Due to its intensity, incorporate rest-pause training 1-2 times per week per muscle group to avoid overtraining.
Sample Rest-Pause Training Workout
Here’s an example of how you can incorporate rest-pause training into a full-body workout:
Upper Body:
- Bench Press:
- Perform 8 reps to near failure.
- Rest for 15 seconds.
- Perform 3-4 more reps.
- Rest for 15 seconds.
- Perform 2-3 more reps until failure.
- Complete 3 sets in this manner.
- Bent-Over Rows:
- Perform 8 reps to near failure.
- Rest for 15 seconds.
- Perform 3-4 more reps.
- Rest for 15 seconds.
- Perform 2-3 more reps until failure.
- Complete 3 sets in this manner.
- Shoulder Press:
- Perform 8 reps to near failure.
- Rest for 15 seconds.
- Perform 3-4 more reps.
- Rest for 15 seconds.
- Perform 2-3 more reps until failure.
- Complete 3 sets in this manner.
Lower Body:
- Squats:
- Perform 8 reps to near failure.
- Rest for 20 seconds.
- Perform 3-4 more reps.
- Rest for 20 seconds.
- Perform 2-3 more reps until failure.
- Complete 3 sets in this manner.
- Deadlifts:
- Perform 6 reps to near failure.
- Rest for 20 seconds.
- Perform 2-3 more reps.
- Rest for 20 seconds.
- Perform 2-3 more reps until failure.
- Complete 3 sets in this manner.
- Leg Press:
- Perform 10 reps to near failure.
- Rest for 20 seconds.
- Perform 5-6 more reps.
- Rest for 20 seconds.
- Perform 3-4 more reps until failure.
- Complete 3 sets in this manner.
Tips for Effective Rest-Pause Training
- Warm-Up Properly: Ensure you are properly warmed up before attempting rest-pause sets to prevent injuries.
- Focus on Form: Maintain proper form throughout each set, even as fatigue sets in. Poor form can lead to injuries.
- Monitor Fatigue: Pay attention to your body’s signals and avoid pushing to the point of excessive fatigue or failure that could compromise safety.
- Adjust Weights Accordingly: Start with conservative weights and gradually increase as you become more comfortable with the technique.
- Prioritize Recovery: Due to the high intensity of rest-pause training, prioritize recovery with adequate sleep, nutrition, and hydration.
Variations of Rest-Pause Training
- Myo-Reps:
- Similar to rest-pause, myo-reps involve an initial activation set followed by multiple mini-sets with short rest periods. For example, perform 12 reps to near failure, rest for 10-15 seconds, then perform 3-5 more reps, repeating this process for several mini-sets.
- Cluster Sets:
- Cluster sets are another form of rest-pause training where a set is broken into smaller clusters with short rest periods. For example, instead of performing 10 continuous reps, break it into 2 sets of 5 reps with a 10-15 second rest in between.
By incorporating rest-pause training into your routine, you can push past plateaus, increase muscle hypertrophy, and enhance strength. This advanced technique, when used correctly, provides a powerful tool for achieving your fitness goals and maximizing your training efficiency.
Conclusion
Implementing these advanced muscle-building techniques can help you overcome plateaus and continue making progress in your strength training journey. Remember, the key to success with these methods is to listen to your body, prioritize recovery, and maintain proper form. Unlock your strength potential and watch your muscles grow like never before.
For more tips and strategies on muscle building, visit MuscleMight.net and join our community of dedicated fitness enthusiasts.
Happy Lifting!